Dinosaurs, Gravity, & the Water Cycle (Art + Books series)
Just over a year ago, I met Carla Jansen via social media and found her Kickstarter for her debut picture book A Dinosaur Made Me Sneeze. Now she’s back with the second book in this scientifically hilarious series, A Dinosaur Made Me Spill.
The first book in this series explains the rock cycle, while Carla’s newest book focuses on the water cycle!
And . . .
A Dinosaur Made Me Spill just became available for preorders on Kickstarter!
This week, I’m excited to join other bloggers celebrating this book and exploring the water cycle through science activities, unit studies, and art projects. You can find a list with all of the activities on the Preschool Powol Packets blog.
Today, I want to focus on just one small part of the water cycle—how the water travels back to the ocean.
To do this activity, kids could build piles of dirt outside in the garden and pour water over the dirt to watch how the water travels into valleys and down into streams and on through the water cycle. (Actually, I would recommend doing that too—dirt + water is always fun!).
But . . . what if you could use art to show how water travels?
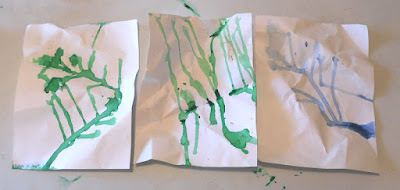
This art project explores how water travels down the hills and valleys in a specific area.
Supplies:
To create this art project, you will need:
• Watercolor paints (or diluted food coloring)
• Paint brushes
• A medicine dropper
• Watercolor paper or cardstock
• Tape (to secure the paper while you are painting)
Instructions:
This activity relies on gravity, just like the water cycle relies on gravity to pull the water down from the clouds, back into the soil, and out into the ocean.
To start, you need to create some hills. Take one sheets of paper and crumple it up. Unfold it partway—it should still have ridges and valleys, just like a hill. Try to keep one side or corner higher than the rest of the paper. You may need to adjust the folds a little to get a good hill shape, and you may need to lean the paper against a tub or container to create a steep hillside.
When you are happy with your hillside, tape the corners of the paper into place, so that it doesn’t slide around as you are working.
Once the paint is ready, fill the medicine dropper with paint.
Wait for the paint to dry, before spreading out the papers to inspect your rivers. Each paint river will be unique, just like each river carves its own path down a hillside and out to the ocean.
If you want, you could look up pictures of rivers, river deltas, and braided rivers to see if you can find any real-life rivers that match your painting.
In these paintings, gravity pulls the paint down the paper, creating the images of the rivers. When the moisture in the air starts to accumulate, gravity acts on it in the same way that it pulls on the paint. Gravity pulls the rain drops down from the clouds and on down the hillsides until it reaches the lowest point on its journey. In some cases, this low spot is a lake or an inland sea, but usually, it's the ocean.
Then the water evaporates and returns to the clouds to begin the water cycle over again!
Variation 1: Paint the ridges.
Crumple a paper into a hilly ridge. Then use a wide paintbrush to loosely brush across the higher sections of the paper. The ridges should catch the brush, collecting more paint than the valleys.
When the paper is dry, spread it out and study the ridges. The darker paint marks the higher peaks on your hill, almost like a topographical map that shows the different elevations of an area.
Variation 2: Spray bottle painting.
For this version of the bottle, you will need a large sheet of paper—at least 18”x24.” Crumple the paper into a hilly ridge, and fill a small spray bottle with colored water. Then let one or more kids spray the paper, focusing on the higher ridges. Watch as the water trickles down into the valleys.
When the painting is dry, see whether you can follow the water’s movements by studying how bright the colors are.
- - - - - - - -


Comments
Post a Comment